Before you start
Mautic does not ship with a native deal pipeline, so adding one starts by installing Deal Flow into the same Mautic instance you already run. The installation steps below are the short version of the full installation guide, and the pipeline setup steps match the current product screens: a Deals menu with Pipeline, Pipelines, and Deal Stages underneath it.
- 01A self-hosted Mautic instance where you can upload a plugin and run console commands.
- 02Your Deal Flow download link and license key from the purchase email.
- 03A short list of the stages you want on day one, such as Identified, Prospect, Opportunity, Closed Won, and Closed Lost.
Keep the first pipeline simple. You can always refine stage names later. The goal of this walkthrough is to get one working pipeline and one working deal inside Mautic without inventing extra process up front.
Step 1: Install the plugin
Deal Flow installs like a standard Mautic plugin: download the bundle, unzip it into plugins/DealFlowBundle/, rebuild the cache, and reload plugins.
# Download the plugin archive to the server
wget -O DealFlowBundle.zip \
  "https://dealflowplugin.com/download?token=YOUR_DOWNLOAD_TOKEN"

# Move to your Mautic root and unzip into plugins
cd /var/www/mautic
unzip /tmp/DealFlowBundle.zip -d docroot/plugins/
chown -R www-data:www-data docroot/plugins/DealFlowBundle

# Rebuild cache and reload plugins
rm -rf var/cache/prod
sudo -u www-data php bin/console cache:warmup
sudo -u www-data php bin/console mautic:plugins:reload
If you want the detailed command notes, including the warning about cache:clear --no-warmup, use the full installation guide. For this tutorial, the important checkpoint is simple: after mautic:plugins:reload, Mautic recognizes DealFlowBundle.
Step 2: Activate the plugin and enter the license key
-
1
Open the Mautic plugin screen
In Mautic, go to Settings → Plugins and open Deal Flow.
-
2
Enter the license key
Paste the key from the purchase confirmation email into the License Key field, then click Save & Close.
-
3
Confirm the new Deals menu appears
Once the plugin is active, the left navigation gains a Deals section. That section is where the pipeline screens live.
Expected result: the left menu shows Deals with entries for Dashboard, Pipeline, Tasks, Pipelines, and Deal Stages.
Step 3: Create the pipeline
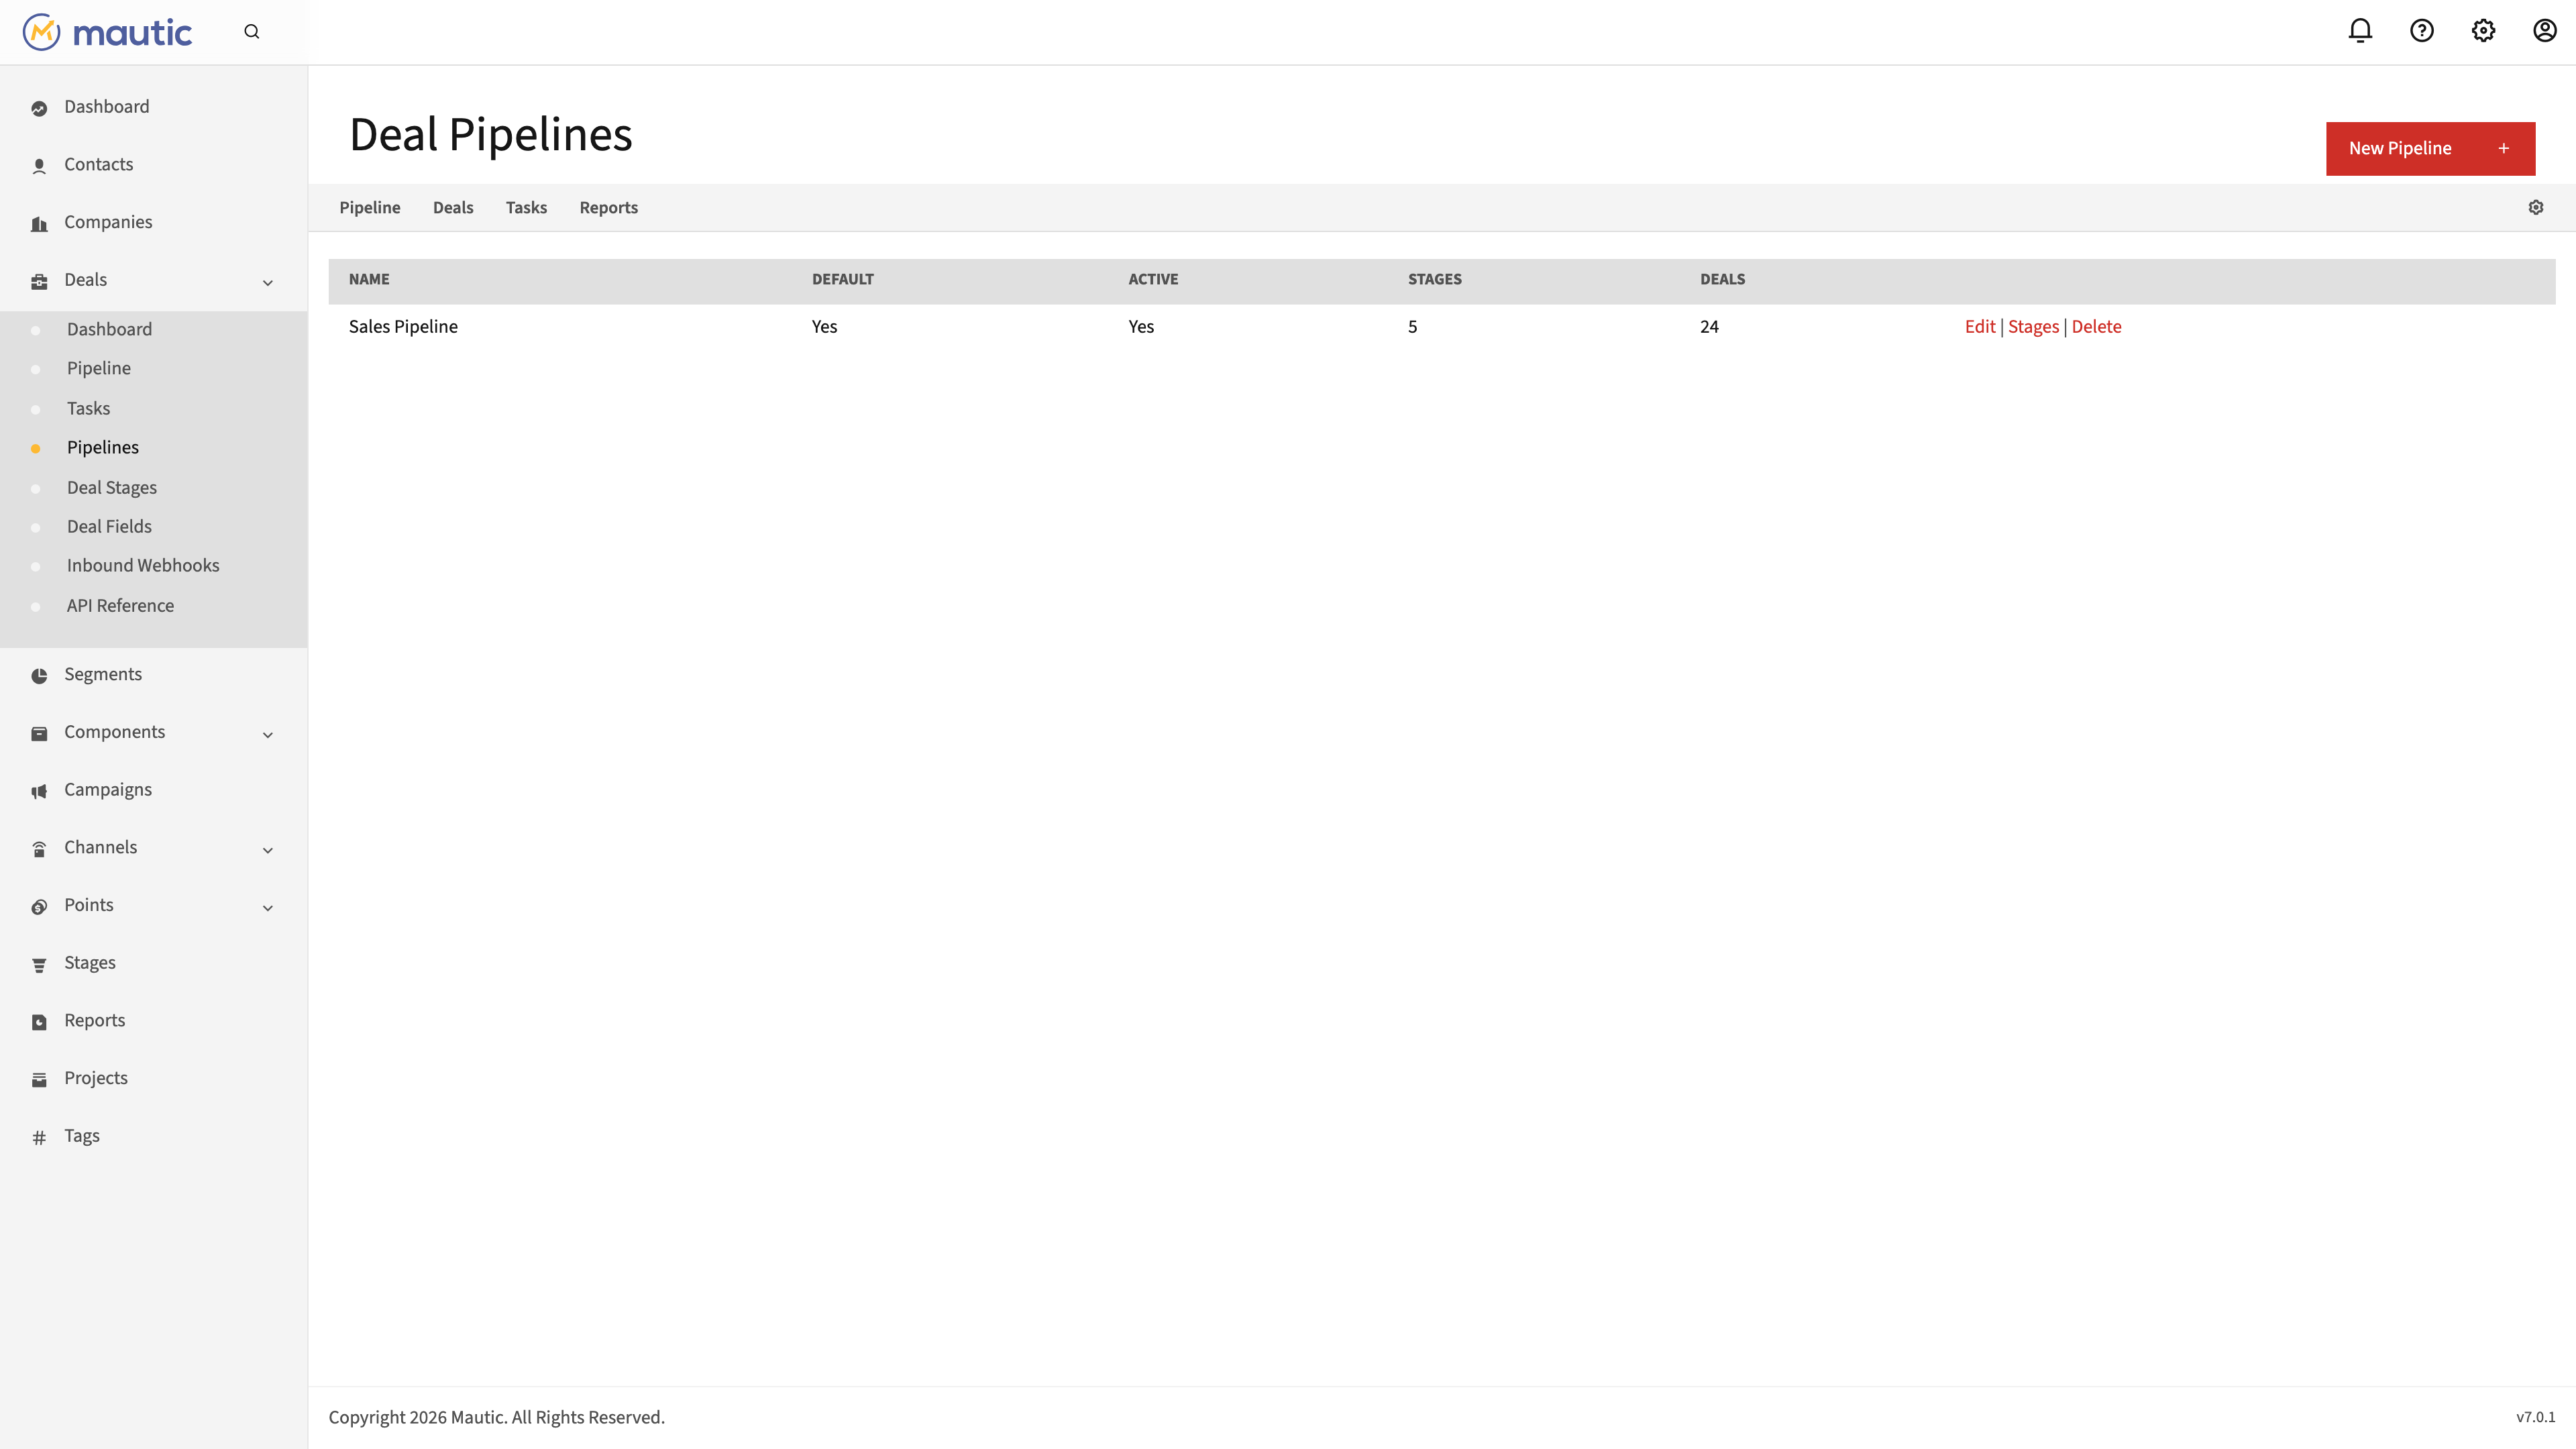
Open Deals → Pipelines. This is the management screen for named pipelines. The pipeline list shows the pipeline name plus whether it is default, active, how many stages it has, and how many deals sit inside it.
-
1
Open the Pipelines screen
Use the Deals menu in Mautic, then click Pipelines.
-
2
Click New Pipeline
The button appears in the top-right corner of the screen. Create one pipeline first rather than several.
-
3
Name it for the process you are tracking
Use a concrete name such as Sales Pipeline, New Business, or Partnerships. After saving, the pipeline should appear back in the list.
If this is the pipeline your team will use most often, make it the default while you are here. The screenshot above shows a saved Sales Pipeline marked as default and active.
Step 4: Add your stages
A pipeline exists before it is useful, but it is not usable until it has stages. On the Pipelines list, each row includes a Stages action. Open that next and add the ordered steps your deals move through.
The current product flow supports open stages plus closed outcomes, and the shipped examples use a sequence like Identified, Prospect, Opportunity, Closed Won, and Closed Lost.
-
1
Open Stages for the pipeline you just created
From Deals → Pipelines, click Stages on that pipeline’s row.
-
2
Add the stages in the order deals will move
Start with the smallest set that reflects your process. Three open stages and two closed stages are enough to begin.
-
3
Save and return to the board
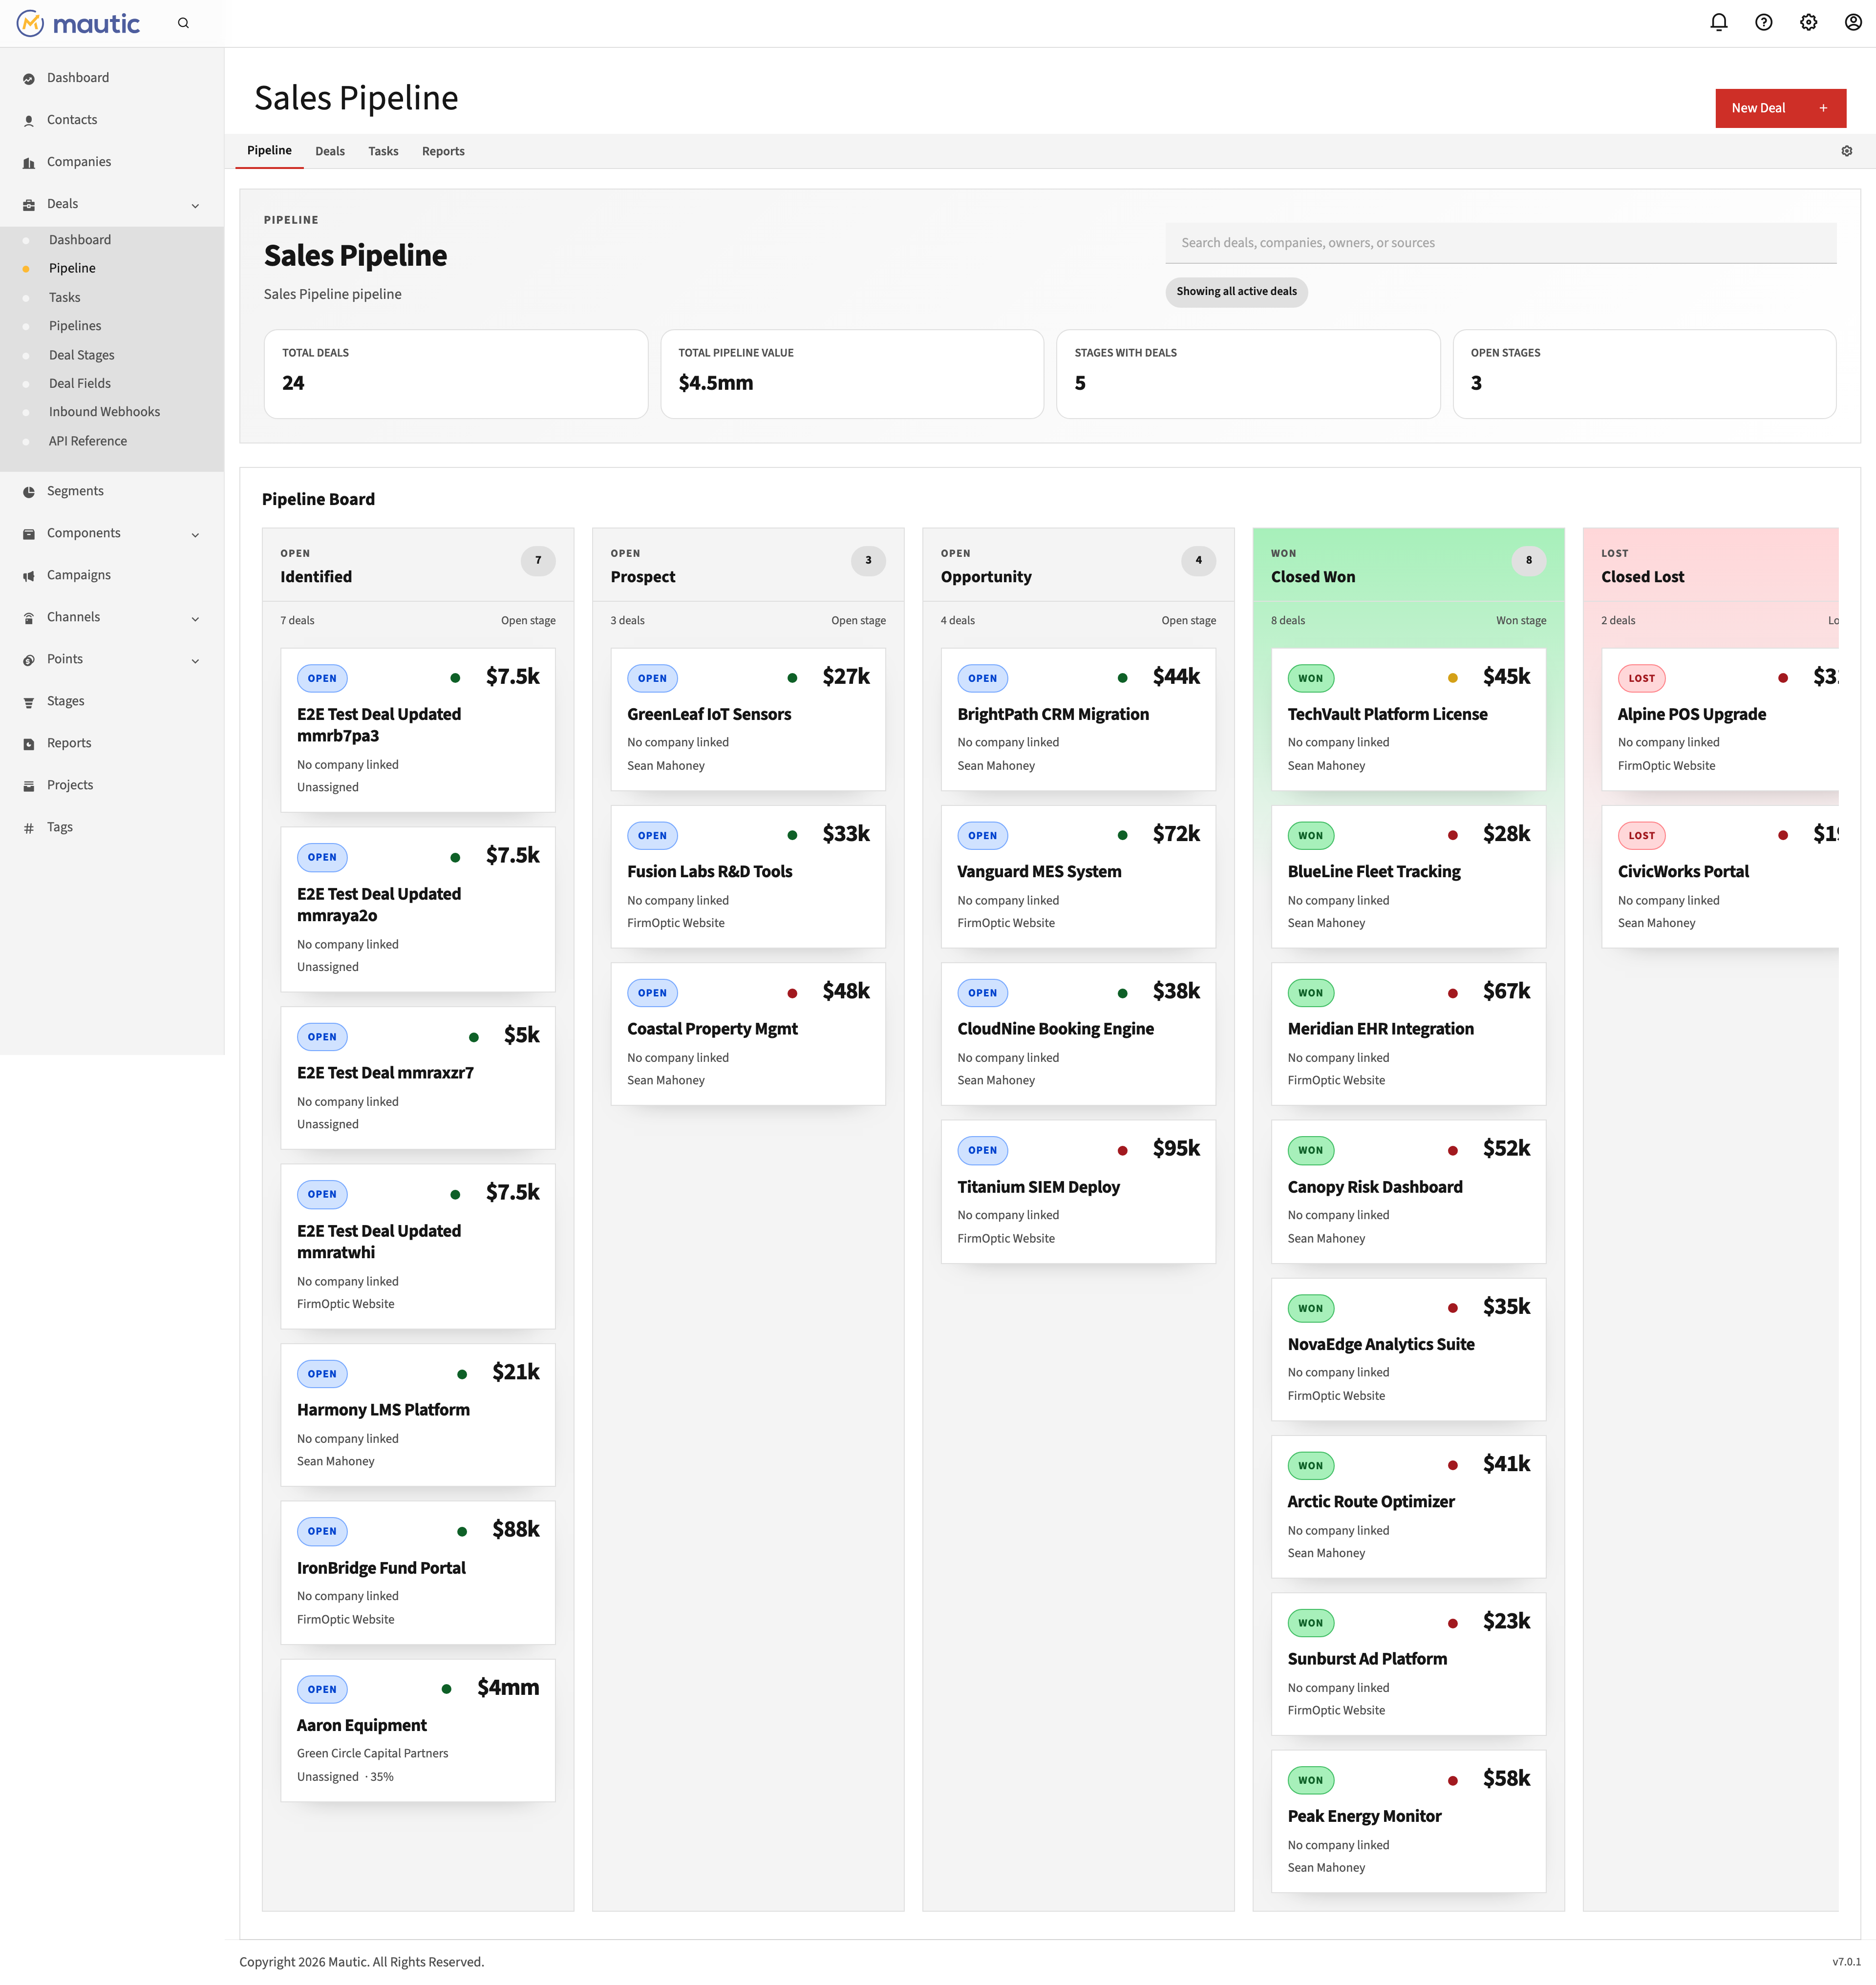
When the stages are saved, the pipeline board can render columns for them. Without stages, there is nowhere for a deal card to land.
Use business language, not reporting language. Stage names should describe where the deal is now, not what you want to measure later. Reporting comes from those stages; it should not drive them.
Step 5: Create your first deal
Now open Deals → Pipeline. This is the live board view. The current interface shows the board columns, search, stage counts, and a New Deal button in the top-right corner.
-
1
Open the Pipeline board
Use Deals → Pipeline to switch from configuration into the working board.
-
2
Click New Deal
The board view exposes the button directly, so you can create deals without leaving the pipeline.
-
3
Enter the deal details
Use the pipeline you just created, set the current stage, and fill in the fields that matter for the first deal: title, amount, company, owner, and expected close date if you have it.
-
4
Save and confirm the card lands on the board
After saving, the deal should appear in the stage column you chose. That is the first proof that the pipeline is live.
Step 6: Verify the workflow on the deal detail page
Open the deal you just created. The detail page is where Deal Flow keeps the rest of the working context: buying committee associations, notes, tasks, files, activity, and the right-hand deal details panel.
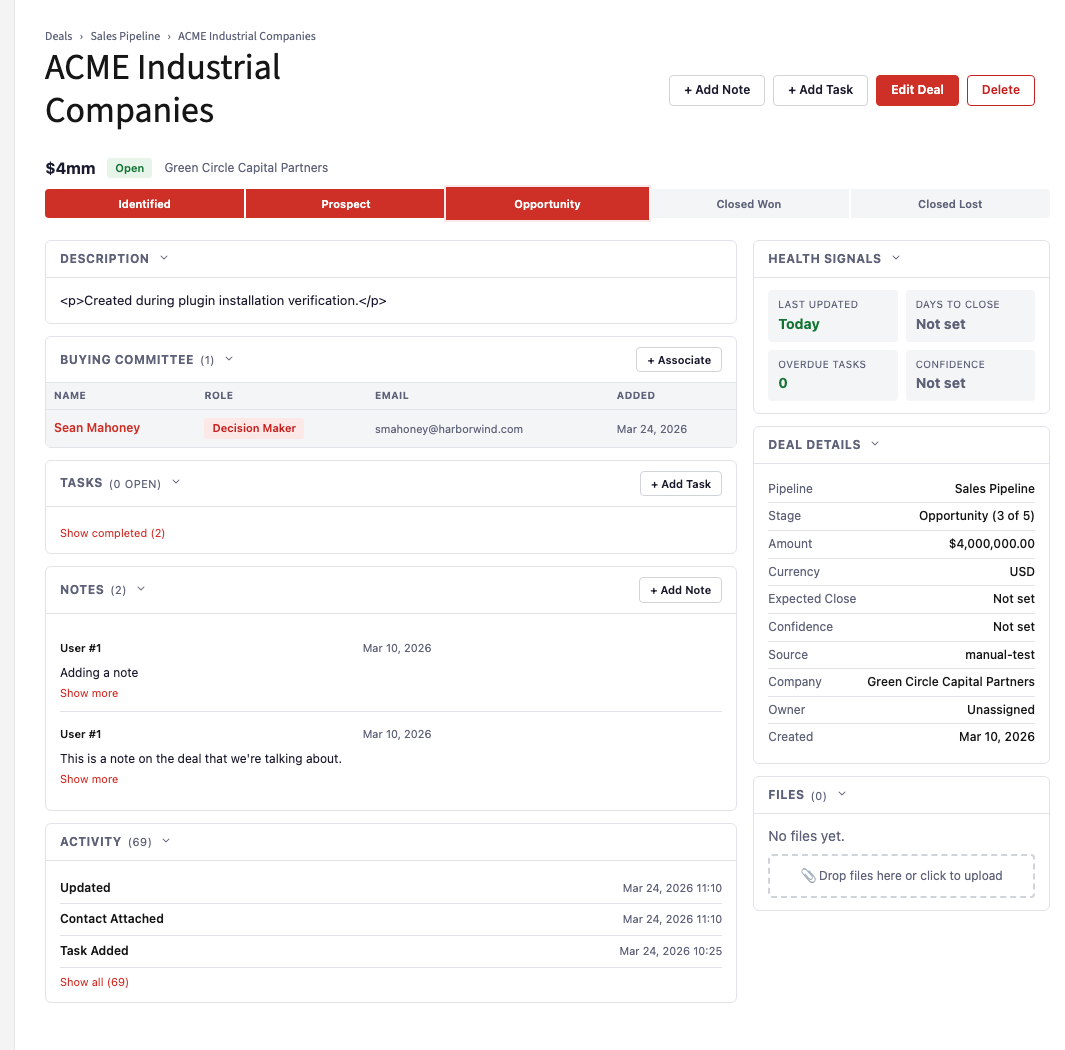
Use this page to check that the new pipeline is doing real work and not just displaying columns:
- Pipeline and stage show the values you just set.
- Amount, currency, owner, and company are attached to the deal itself, not buried in a contact note.
- Add Note and Add Task are available immediately, so the deal can become an operating record instead of a static card.
- Buying Committee is ready when you want to associate more than one contact with the same deal.
- AThe pipeline appears under Deals → Pipelines.
- BThe pipeline board shows the stage columns you created.
- CYour first deal card appears in the expected column.
- DThe deal detail page shows the pipeline, stage, and amount in the sidebar.
Once those four checks pass, you have moved past “plugin installed” into an actual working pipeline inside Mautic.
Frequently asked questions
Can I add a pipeline to core Mautic without a plugin?
No. Core Mautic has contact stages, but it does not include a native deal object or a deal board. Adding a real pipeline inside Mautic requires a plugin layer that creates deals, pipelines, stages, and their related screens.
What stages should I start with?
Start with the fewest stages that describe how deals actually move. A basic first pass is Identified, Prospect, Opportunity, Closed Won, and Closed Lost. You can rename and expand later once the team is using the board daily.
What is the difference between Pipeline and Pipelines in the menu?
Pipeline is the working board where deals are viewed and moved. Pipelines is the configuration list where you create a named pipeline and manage actions such as editing it or opening its stages.
What should I do after the first deal is live?
Add the real stakeholders to the deal, create the first follow-up task, and decide whether the deal stage should sync to a Mautic contact stage. The broader context for that is in Mautic Stage vs Pipeline and Buying Committee Tracking.
Ready to build the pipeline in your own Mautic?
Use the install flow, create the first board, and then finish setup from the main pricing and purchase path.
See Pricing and Install Options Try free for 7 days